
Open Broadcaster Software
Free, open source software for live streaming and recording
Main Window
Scenes
Sources
Features
Basic Settings
Advanced Settings
FAQ
Encoding Settings
(Shown settings are just an example. Each streamer should experiment with their own settings.)
When configuring encoding, make sure to test your available bandwidth first, typically using a site like http://www.speedtest.net/. For all other settings, there is an official OBS settings estimator.
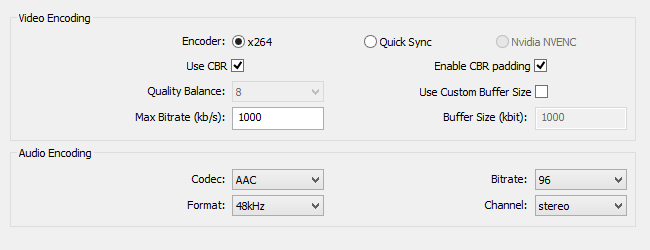
Video Encoding
Encoder (x264/Quick Sync/Nvidia NVENC)
OBS supports more than just the standard CPU encoding using x264. If available on your system you can switch between the x264 encoder, the Intel Quick Sync encoder and the Nvidia encoder included in newer gen graphic cards by nvidia. Each of the encoders has different abilities with x264 being probably the most stable one. For online streaming this is the recommended encoder.
Use CBR
This will set x264 to use constant bitrate rather than variable bitrate. The "quality balance" setting will have no effect as the quality will be determined entirely by your bitrate, and x264 will try to ensure your stream goes out at exactly at bitrate specified. This results in a less spiky (bandwidth wise) stream, but will also cause both you and your viewers to consume more total bandwidth as scenes with no motion at all will still use the specified bitrate.
CBR can help with QoS/latency issues caused by variable bitrate as TCP is not well designed for variable bandwidth. The quality cost of CBR is quite low and the issues it can fix such as viewers complaining of lag when there are no dropped frames can make this worth using, and it also eliminates the burden of having to pick an appropriate quality value.
- Recommended: Generally safe to have on unless you're worried about total bandwidth usage.
Quality Balance
When using variable bitrate, this controls the CRF (constant rate factor) parameter in x264 (10 is CRF 22, 0 is CRF 32). This is only used with variable bitrate, and determines how the video encoder should spend bits for quality. This value is not used and disabled if using CBR (constant bitrate). Generally the value you should set this to depends on your bitrate, resolution, and FPS. If you have a high bitrate relative to your resolution/FPS, you can safely set this higher, but if you have a lower bitrate relative to your resolution/FPS, higher values will cause pixellation in higher motion scenes, so the value needs to be lowered. If you get undesirable pixellation on higher motion, it generally means you should turn down this value until it stops, or increase your bitrate.
- Recommended: Varies depending on resolution/fps relative to the bitrate. 5 is usually the "safest" value for most situations.
Max Bitrate
Tells the video encoder (x264) to target this bitrate in kbps. If using variable bitrate, the actual bitrate will vary depending on the complexity of the scene. Combined with the audio bitrate, this will determine how much upload you want to be used. If you have high upload speed, keep in mind that your viewers will require an equivalent download speed to be able to view your stream, so you probably don't want to go over 3500kbps or so unless you're a partnered streamer and have access to the transcoders (lower resolution selections for viewers).
- Recommended: 70%-80% of your upload speed, going over 3500kbps is generally not recommended unless partnered
Use Custom Buffer Size / Buffer Size
This ties in closely with the bitrate. x264 will encode everything into a fixed size buffer of this size. Raising it can increase motion quality, but at a cost; if there is a sudden scene change and high motion, it can fill up this buffer at a rate faster than the average max bitrate. For example if you have a bitrate of 3000 and a buffer of 6000, x264 could decide that if a scene is complex enough, to use 5000 of the 6000 buffer at once. Though your overall average bitrate will stay the same, this makes your actual network data quite spiky, which can lead to latency issues for both you and your viewers. Setting it too low on the other hand can make your transmission less spiky, but can reduce motion quality.
- Recommended: Leave "custom buffer size" unchecked and use the same as bitrate
Audio Encoding
Codec
You can select to use AAC or MP3. Using AAC is recommended, but it is especially recommended for file output, as many file players do not always properly support MP3 audio in MP4 files.
Bitrate
This is the desired bitrate you wish to use for audio. Lower sacrifices quality to reduce bandwidth usage, while higher gives higher quality at the cost of bandwidth. Make sure to factor in video bitrate when setting audio bitrate.
Format
Let's you switch between 44.1kHz and 48kHz audio formats.
Channel
This option allows you to switch to mono output instead of the default stereo. For example to save upload ressources.